
ProUnit User Guide
Installing ProUnit
When downloading the lastest version of ProUnit, you got a .zip file. This .zip file contains:
- the documentation (actually, this website) in the "website" directory
- the software (other directories)
All you have to do is:
- uncompress the file in a directory of your choice
- add full path to prounit_dlcXX.pl to the PROPATH (where XX is your Progress/OpenEdge version)
-
- in case of client/AppServer usage, you shound add prounit_dlcXX.pl to PROPATH for both client and AppServer
- in other cases, only one session needs this PROPATH adjustements
- you're now ready to run ProUnit
Running ProUnit
There are many ways to start running ProUnit (let's consider here only the graphical user interface), both by command line (prowin32 -p) or by the procedure editor (RUN ...).
- running startProUnitGUI.p
- running startProUnitBatch.p
In all cases ProUnit library and required directories will be automatically added
to the propath (and propath restored when exiting ProUnit).
Once you have started ProUnit GUI you should get a window like the one bellow:

Adding Test Cases (tests programs) to your Test Suite
Once you have started ProUnit you're able to add your test cases in the test suite (you'll see how to create Test Cases later). The Test Suite is a set of test cases you have for your project.
To add test cases you just have to push "Add a test case" button ( )
and type the name of your Test Case (that is, the program file name or relative path). ProUnit will
look for the test case in all the directories in the PROPATH.
)
and type the name of your Test Case (that is, the program file name or relative path). ProUnit will
look for the test case in all the directories in the PROPATH.

After you confirm this action you'll see the test case in the treeview on the left, like the image bellow:

You add as many entries as there are test cases to be tested.
You can also change the execution sequence using Up and Down buttons
( and
and  ).
).
Adding Test Sets
After some time the amount of tests cases you produce will probably be high and you'll find out you need to arrange them in groups based on any criteria. For example, you might have groups for utility components, data access objects, business objects and so on.
ProUnit lets you arrange your tests using Test Sets.
To create a
new Test Set, click the "Add a test set" button ( ) and give it a
name (the name you think fits better to the test cases it will
group). Then you can use the "Move into" and "Move out" buttons
(
) and give it a
name (the name you think fits better to the test cases it will
group). Then you can use the "Move into" and "Move out" buttons
( and
and  )
to move the test cases (or other test sets) into or out of a test set.
)
to move the test cases (or other test sets) into or out of a test set.
Managing Test Sets and Test Cases
You can use those features to manage all your Test Suite:
- rename test set using the "Rename selected test set" button (
 )
) - remove test set using the "Remove selected item" button (
 )
) - remove test case using the "Remove selected item" button ()
Running the Test Suite
Once you have added and arranged all your test cases you just have to run the tests clicking on the "Run all tests" button ( ) or by pressing F2.
ProUnit will then run all the tests, as in the image bellow:
) or by pressing F2.
ProUnit will then run all the tests, as in the image bellow:
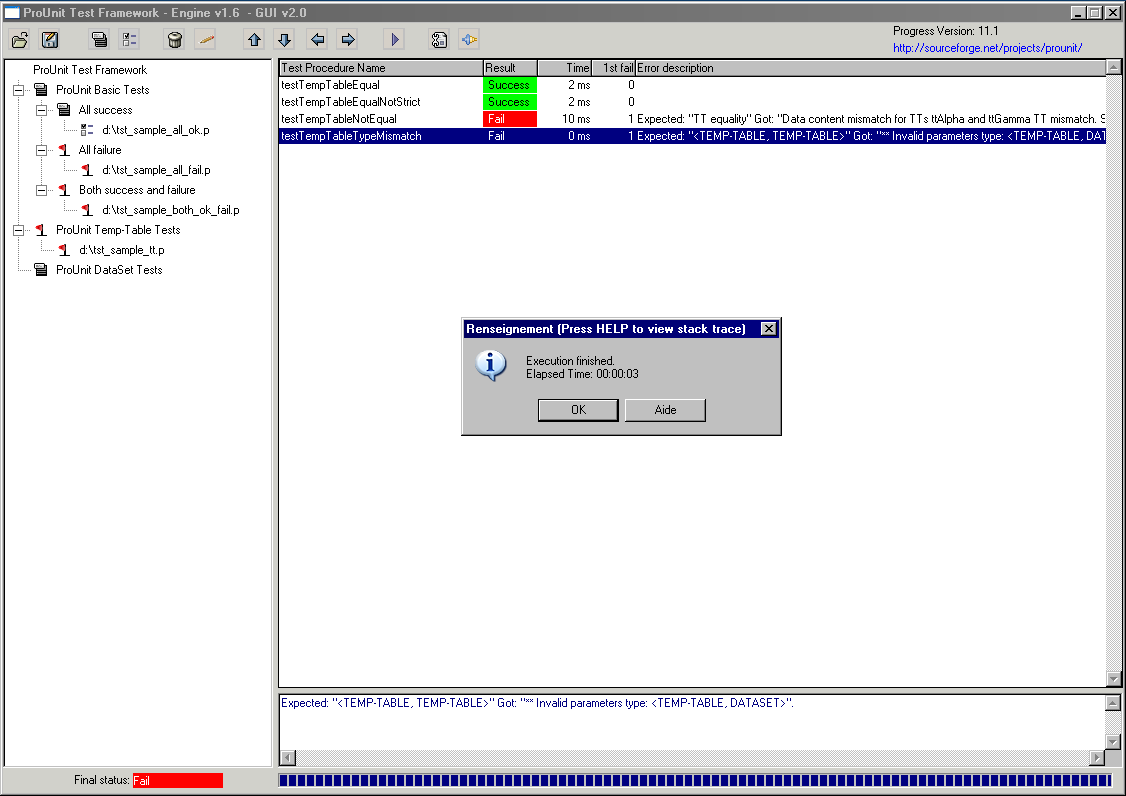
After running a suite, ProUnit shows you an overview of it in the
treeview. Successful test cases or sets won't have their icons
changed, but failed ones will be maked by a red flag ( ) so you
can click on it to see the details in the browser. It then will
show you:
) so you
can click on it to see the details in the browser. It then will
show you:
- the name each test run (which means the name of the test<something> procedures)
- the final status of the test (that can be Success if it run fine, Fail if it has failed or Warning if the system couldn't determine if it has failed or not because no assert was executed).
- first Assert Failed (very useful for debuging the code)
- execution Time (to let you know which tests are slower)
- error description (shown only if the test has called the fail method)
If a test didn't call any Assert method ProUnit won't be sure if it has passed or
not and will mark the test, the test case and all the parents test sets
as suspect ( ). Thoses tests should be
revised to avoid this situation.
). Thoses tests should be
revised to avoid this situation.
Commenting the Test Suite
When you save a test suite, ProUnit lets you add a comment.
You can view comments by clicking on the "View comments" button ( ).
).
Saving Results
Some companies have to keep reports of any execution (specially those run on integration builds) for SQA inspections. ProUnit provides a very extensible and customizable report engine based on XML and XSLT that make it possible to change completely the report format (adding logos, changing fonts, etc), create multiple styles or saving plain XML files to be imported into a database.
ProUnit allow you to save results in many forms:
- XML with SLST
- JUnit XML
- CSV file
- Plain text file with indentation


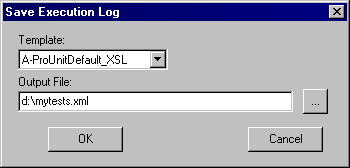
To save the execution report, click on the Save Results button ( ).
Then select the destination file, the template used (or none, if you want a plain XML file) and click OK, as in the image bellow:
).
Then select the destination file, the template used (or none, if you want a plain XML file) and click OK, as in the image bellow:
Saving and Loading Test Suites
Once you have added all your Test Cases and arranged them the way
you want you can save this configuration to an XML file and load
it later using the Load and Save buttons
( and
and  ).
).
The configuration file will contain information about:
- all your test sets and test cases
- active plugins you have selected (see Plugins page)